Update your skills here
Wednesday, 11 October 2017
VM - Development Guide
Install packages:-
==========
sudo apt-get update
sudo apt-get install
sudo apt-get install curl
sudo apt-get install default-jre
Java Installation & Managing Java:-
=====================
There can be multiple Java installations on one server. You can configure which version is the default for use in the command line by using update-alternatives, which manages which symbolic links are used for different commands.
sudo update-alernatives --config java -> this lists out all the installed java's, so that we can chose among them which one to use
sudo add-apt-repository ppa:webupd8team/java
sudo apt-get update
sudo apt-get install oracle-java8-installer - Oracle JDK8
sudo apt-get install oracle-java9-installer - Oracle JDK9
set JAVA_HOME env in /etc/environment
sudo gedit /etc/environment - save
to make it effect -> soure /etc/environment
check echo $JAVA_HOME -> Now should be able to see
Docker Installation:-
============
Docker is available in two editions: Community Edition (CE) and Enterprise Edition (EE).
Docker Community Edition (CE) is ideal for developers and small teams looking to get started with Docker and experimenting with container-based apps. Docker CE has two update channels, stable and edge:
Stable gives you reliable updates every quarter
Edge gives you new features every month
For more information about Docker CE, see Docker Community Edition.
Docker Enterprise Edition (EE) is designed for enterprise development and IT teams who build, ship, and run business critical applications in production at scale. For more information about Docker EE, including purchasing options, see Docker Enterprise Edition.
Set up the repository
Update the apt package index:
$ sudo apt-get update
Install packages to allow apt to use a repository over HTTPS:
$ sudo apt-get install apt-transport-https ca-certificates curl software-properties-common
Add Docker’s official GPG key:
$ curl -fsSL https://download.docker.com/linux/ubuntu/gpg | sudo apt-key add -
Verify that you now have the key with the fingerprint 9DC8 5822 9FC7 DD38 854A E2D8 8D81 803C 0EBF CD88, by searching for the last 8 characters of the fingerprint.
$ sudo apt-key fingerprint 0EBFCD88
[ Use the following command to set up the stable repository. You always need the stable repository, even if you want to install builds from the edge or test repositories as well. To add the edge or test repository, add the word edge or test (or both) after the word stable in the commands below.
Note: The lsb_release -cs sub-command below returns the name of your Ubuntu distribution, such as xenial. Sometimes, in a distribution like Linux Mint, you might have to change $(lsb_release -cs) to your parent Ubuntu distribution. For example, if you are using Linux Mint Rafaela, you could use trusty.
amd64:
sudo add-apt-repository \
"deb [arch=amd64] https://download.docker.com/linux/ubuntu \
$(lsb_release -cs) \
stable"
Install Docker CE
Update the apt package index.
sudo apt-get update
Install the latest version of Docker CE, or go to the next step to install a specific version. Any existing installation of Docker is replaced.
sudo apt-get install docker-ce ] OR
[
Install docker engine from
https://apt.dockerproject.org/repo/pool/testing/d/docker-engine/
And, run following commands
sudo dpkg -i /path/to/package.deb
To make sure it was installed, just type:
sudo docker run hello-world
]
sudo docker login
sudo docker run hello-world
sudo docker ps
sudo docker ps -a
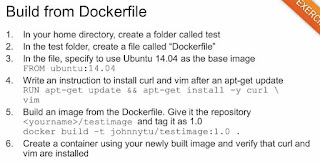
sudo docker build -t aai-resources .
sudo docker run -td aai-resources
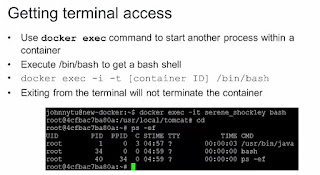
sudo docker exec -t -i <container_id> /bin/bash
sudo docker logs aai-resources
Wednesday, 5 July 2017
Vagrant - Virtual Environment : Problem while running a command in VM
Problem : While in Lab 5: Create an RA Project , when
I did Task 2 (2. make TOOLKIT_DIR=/home/vagrant/.devops-toolkit toolkit-venv),
I get the following error. Earlier it worked for a particular RA( it
downloaded something), I’ve tried to create another RA, I see following error.
Could please give any clue why I’m getting this. Many thanks.
vagrant@vagrant-ubuntu-trusty-64:~/shared/myradocker1$
make
TOOLKIT_DIR=/home/vagrant/.devops-toolkit toolkit-venv
New python executable in
/home/vagrant/shared/myradocker1/env/bin/python2.7
Also creating executable in
/home/vagrant/shared/myradocker1/env/bin/python
Traceback (most recent call last):
File "/usr/local/bin/virtualenv", line 11,
in <module>
sys.exit(main())
File
"/usr/local/lib/python2.7/dist-packages/virtualenv.py", line 713, in
main
symlink=options.symlink)
File
"/usr/local/lib/python2.7/dist-packages/virtualenv.py", line 925, in
create_environment
site_packages=site_packages, clear=clear,
symlink=symlink))
File
"/usr/local/lib/python2.7/dist-packages/virtualenv.py", line 1370, in
install_python
os.symlink(py_executable_base, full_pth)
OSError: [Errno 71] Protocol error
make: *** [toolkit-venv] Error 1
vagrant@vagrant-ubuntu-trusty-64:~/shared/myradocker1$
PS: Earlier I was stuck up at this level when I’m trying
to create from first RA it is because Tech Mahindra network as restricted while
downloading something, I switched to Open Internet , then it worked. This time,
though I’m in Open Internet , still I’m getting this error.
Solution : Running vagrant command (vagrant up ; for VM) solved the problem
Wednesday, 15 March 2017
Subscribe to:
Comments (Atom)


